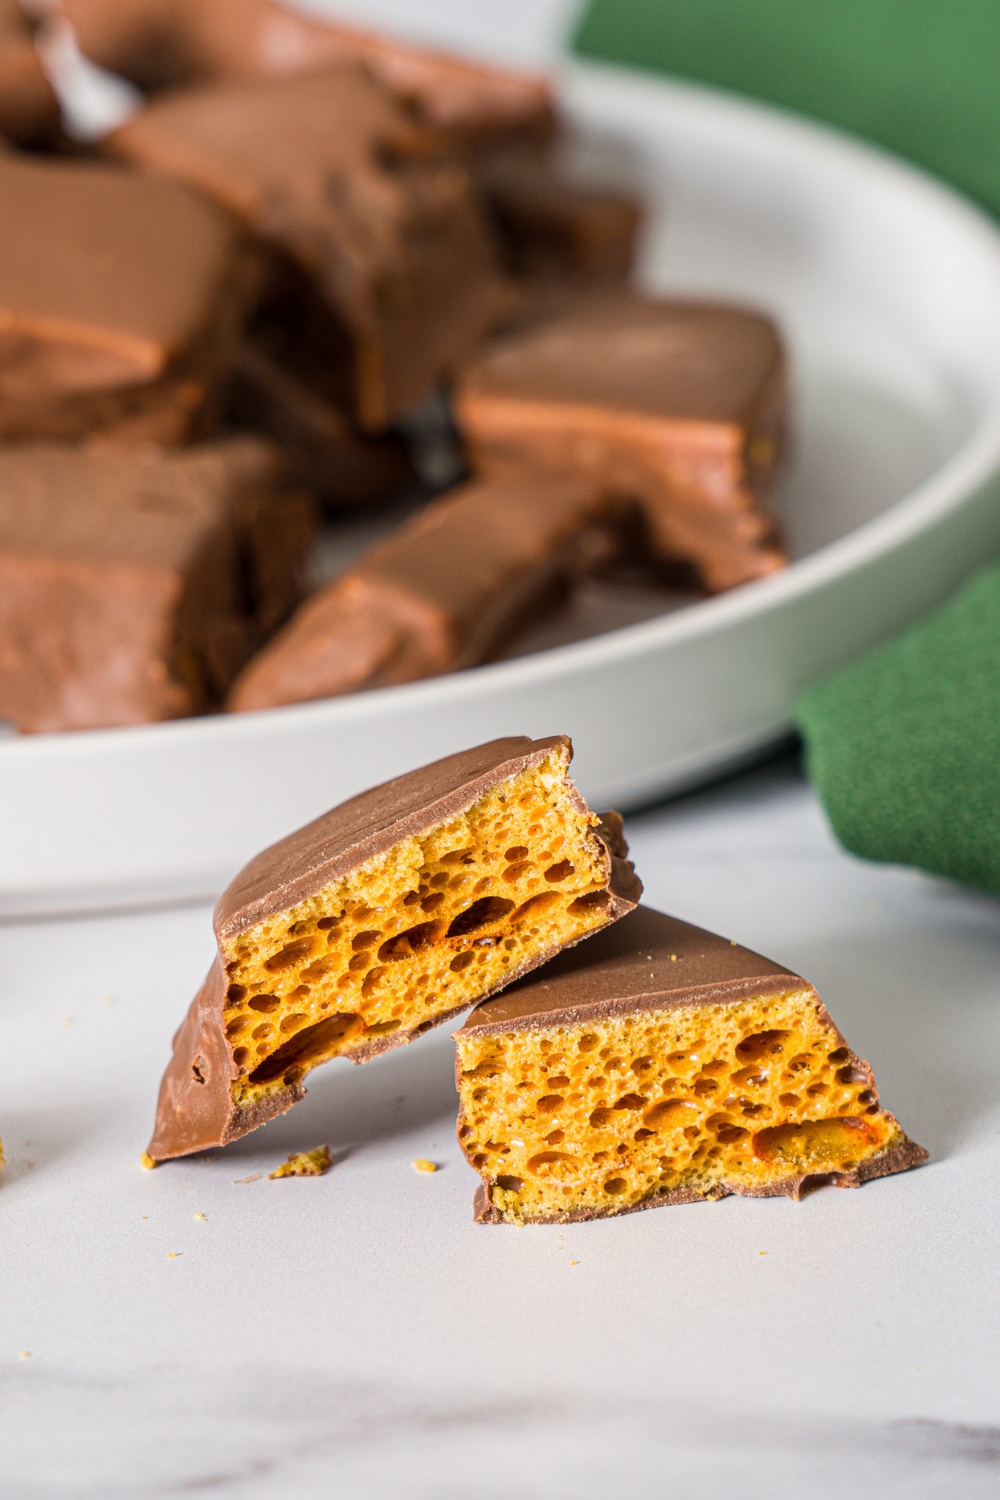
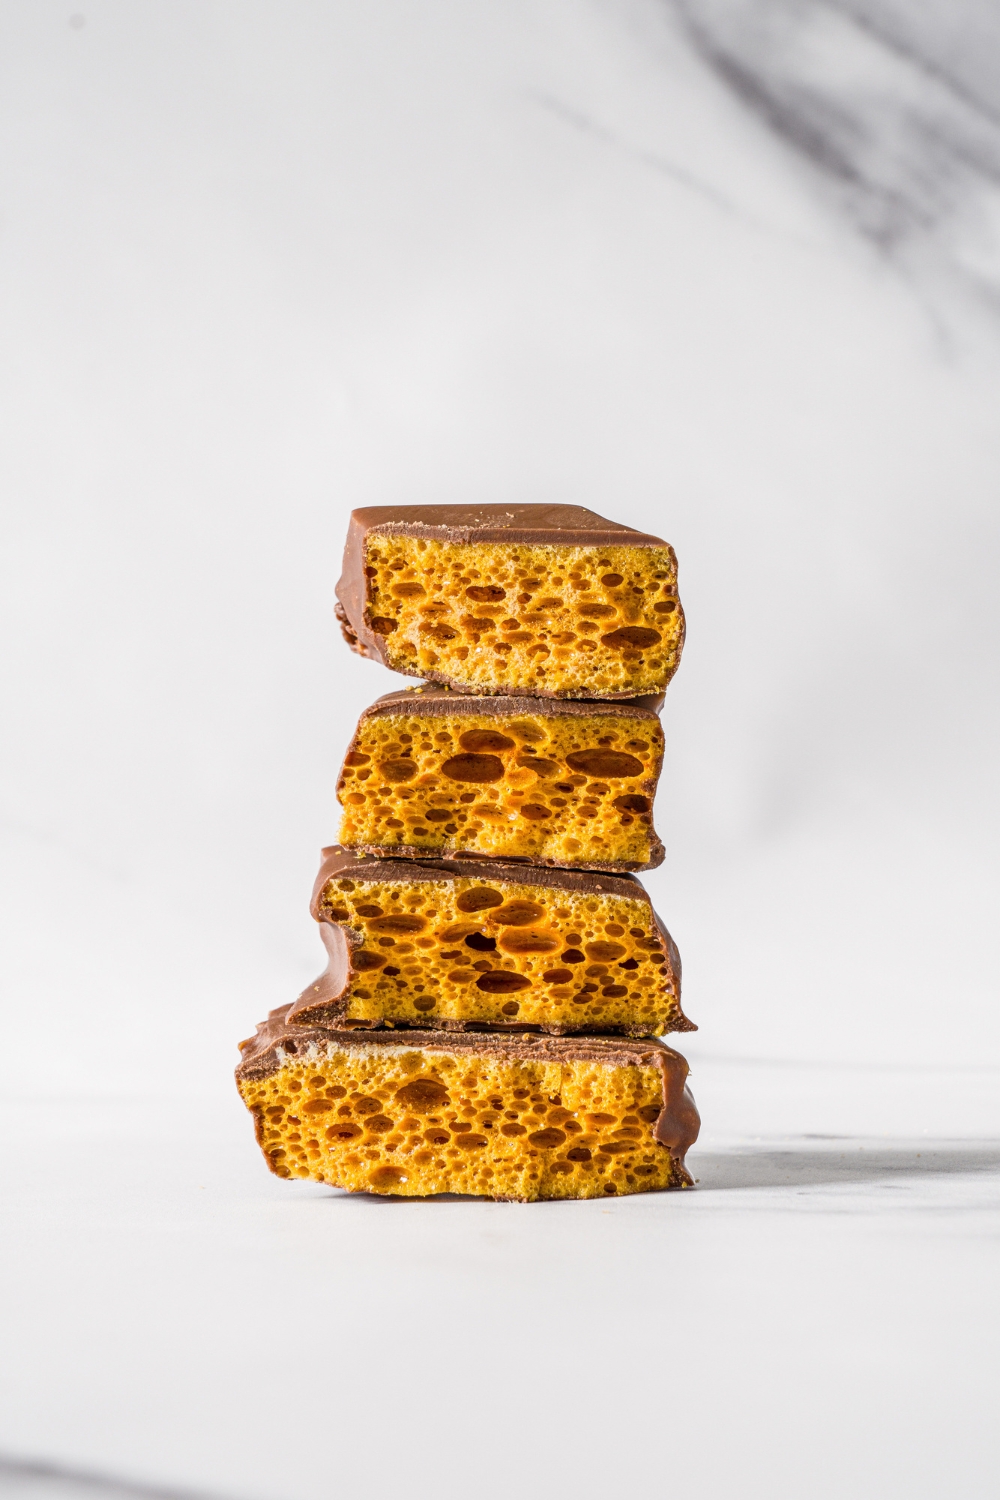
If you’ve never made sponge candy at home (or you’ve never even heard of it), you’re going to love this. It’s a light, crunchy honeycomb-style candy with little airy bubbles inside, then it’s dipped in milk chocolate. It’s sweet, crisp, and breaks with that perfect snap. It tastes like something you’d buy from a candy shop, but you can make it in your own kitchen, and it’s a killer gift for the holidays.

Table of Contents
Why You'll Love This Sponge Candy Recipe
I’m from Buffalo, NY, and sponge candy is basically a hometown staple. Every chocolate shop has it, and my personal favorite has always been Watson’s Chocolates. It’s the kind of candy I buy every holiday for gifts, and I’ve been eating it since I was a kid. I wanted a homemade sponge candy recipe that gives you that same classic Buffalo-style crunch at home, especially if you live somewhere you can’t just walk into a chocolate shop and grab a box.
The best part about this recipe is that you don’t need fancy equipment, just a candy thermometer and a little confidence. Once you hit the right temperature, it’s surprisingly straightforward. Honey gives it a deeper flavor, corn syrup helps keep the texture smooth (no gritty crystals), and baking soda is the magic that creates those signature airy bubbles and that light, shattery bite.
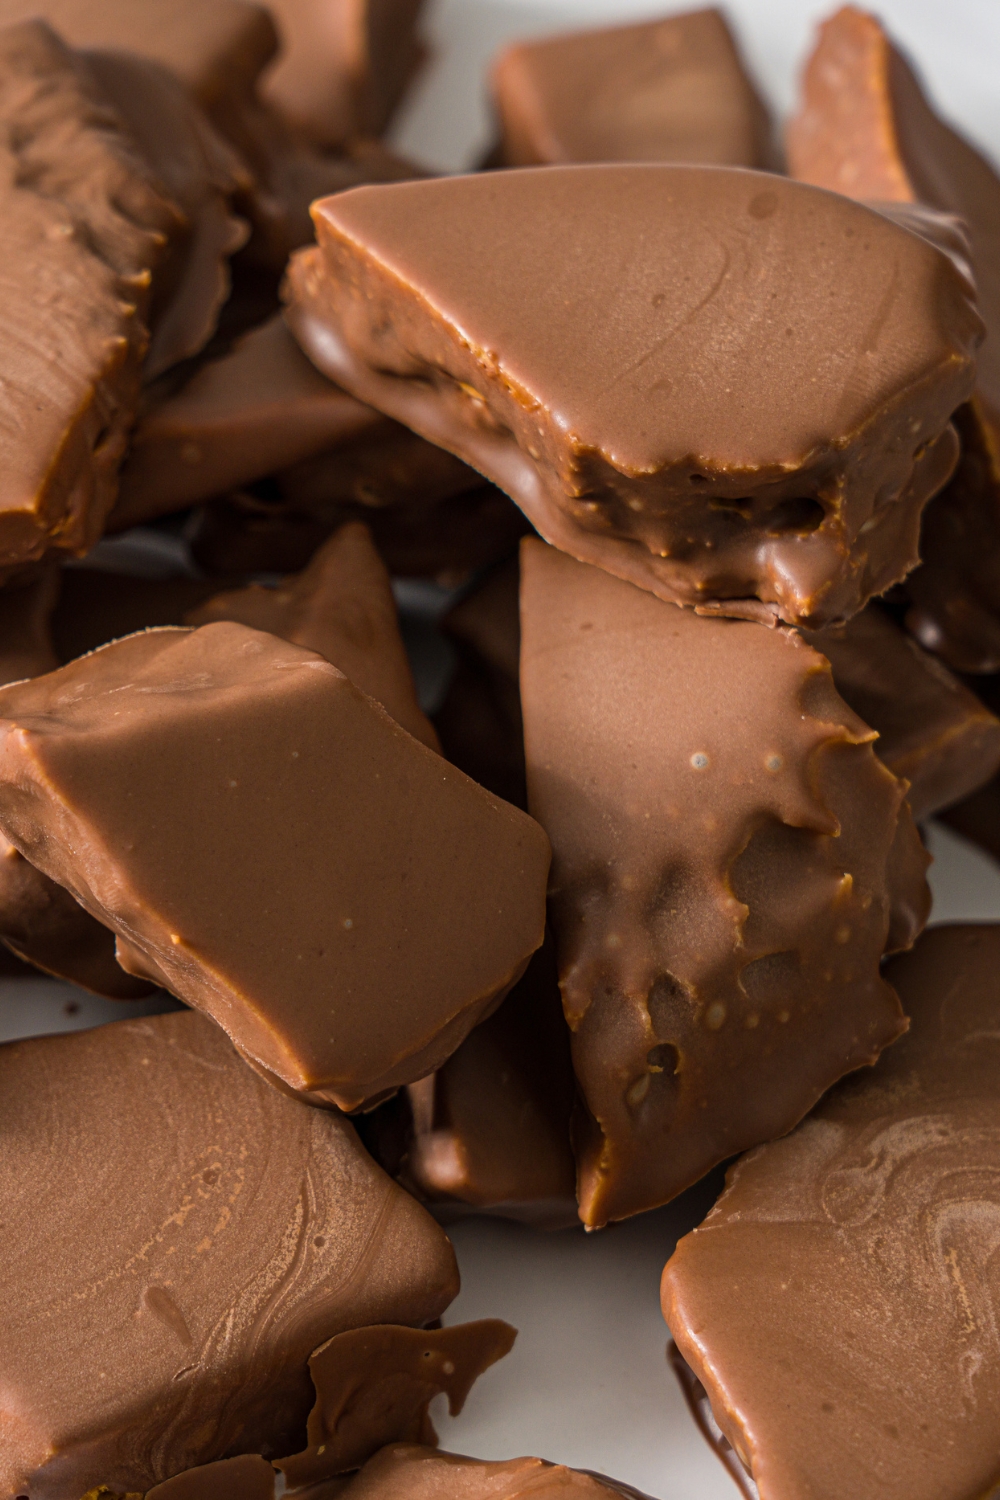
And this recipe is easy to customize. Dip it in milk chocolate, dark chocolate, or white chocolate. Drizzle it, sprinkle flaky salt, or go full holiday and add crushed peppermint. Or keep it simple and leave it plain if you just want the honeycomb. Either way, it tastes like something you’d buy from a candy shop.
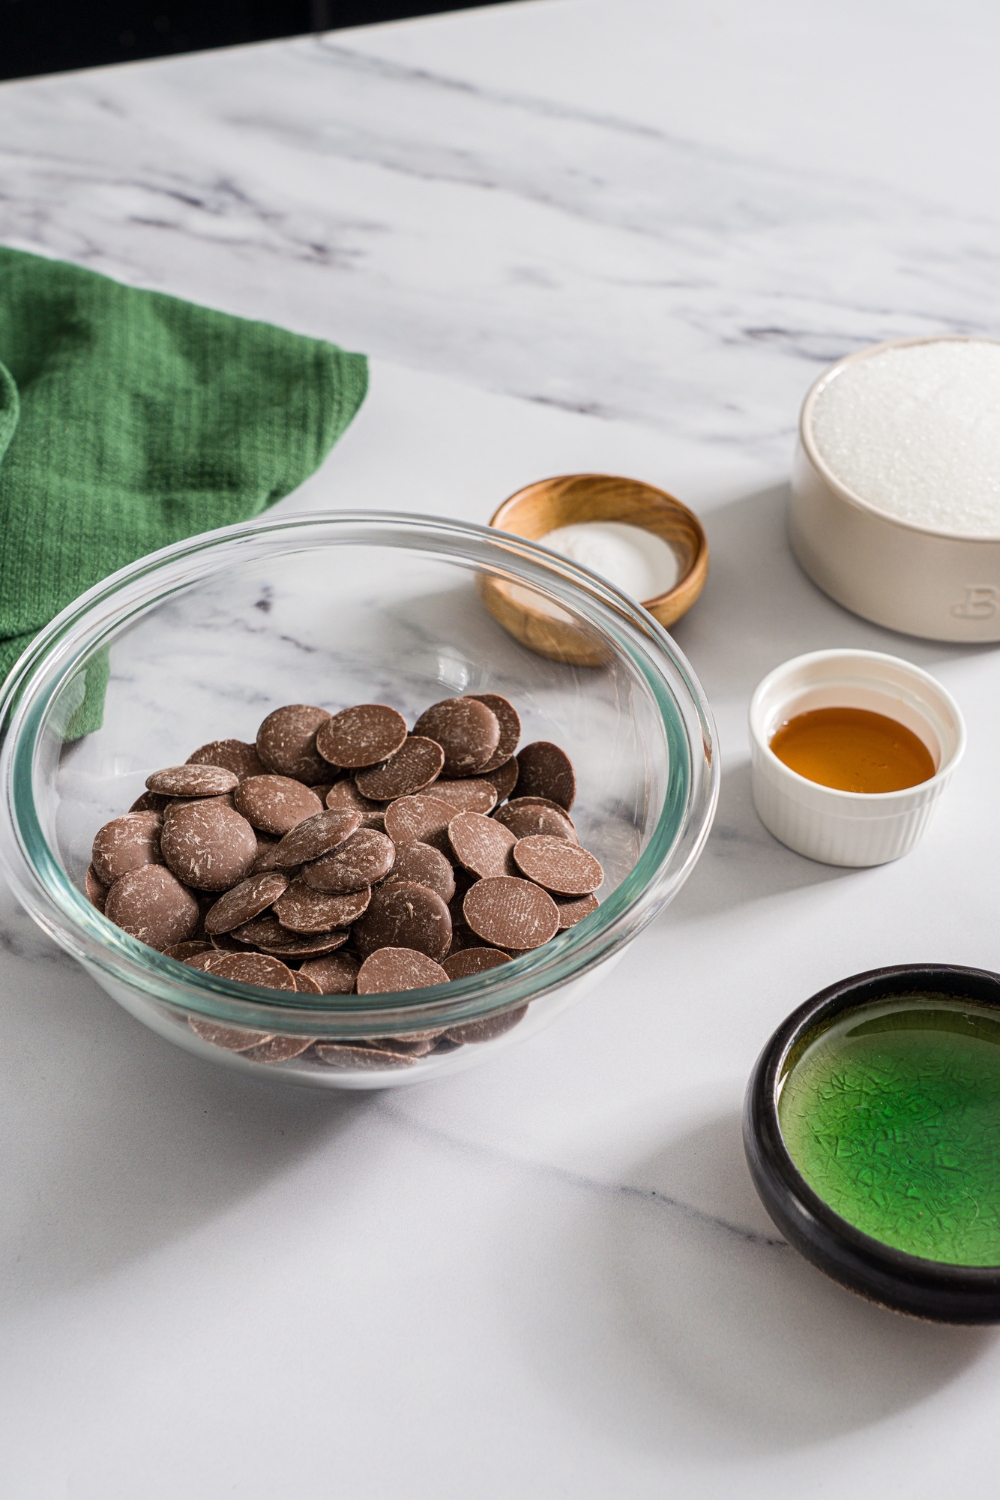
Sponge Candy Ingredients
- 1 cup sugar
- 3 tablespoons water
- 4 tablespoons corn syrup
- 1 tablespoon honey
- 1 ½ teaspoons baking soda
- 1 cup milk chocolate
- 1 tablespoon coconut oil (optional, helps chocolate melt smoother)
Equipment You’ll Want Ready
- Candy thermometer (strongly recommended for accuracy)
- Medium saucepan with taller sides (helps when it foams up)
- Wooden spoon or sturdy spatula (you’ll stir fast at the end)
- Parchment paper
- 8x8 baking dish (or a similar pan)
- Fork (for dipping the pieces in chocolate)
- Microwave-safe bowl (for melting the chocolate)
How to Make Sponge Candy
Step 1: Prep the pan
Line an 8x8 baking dish with parchment paper and set it aside. Make sure you can lift the candy out easily once it sets.
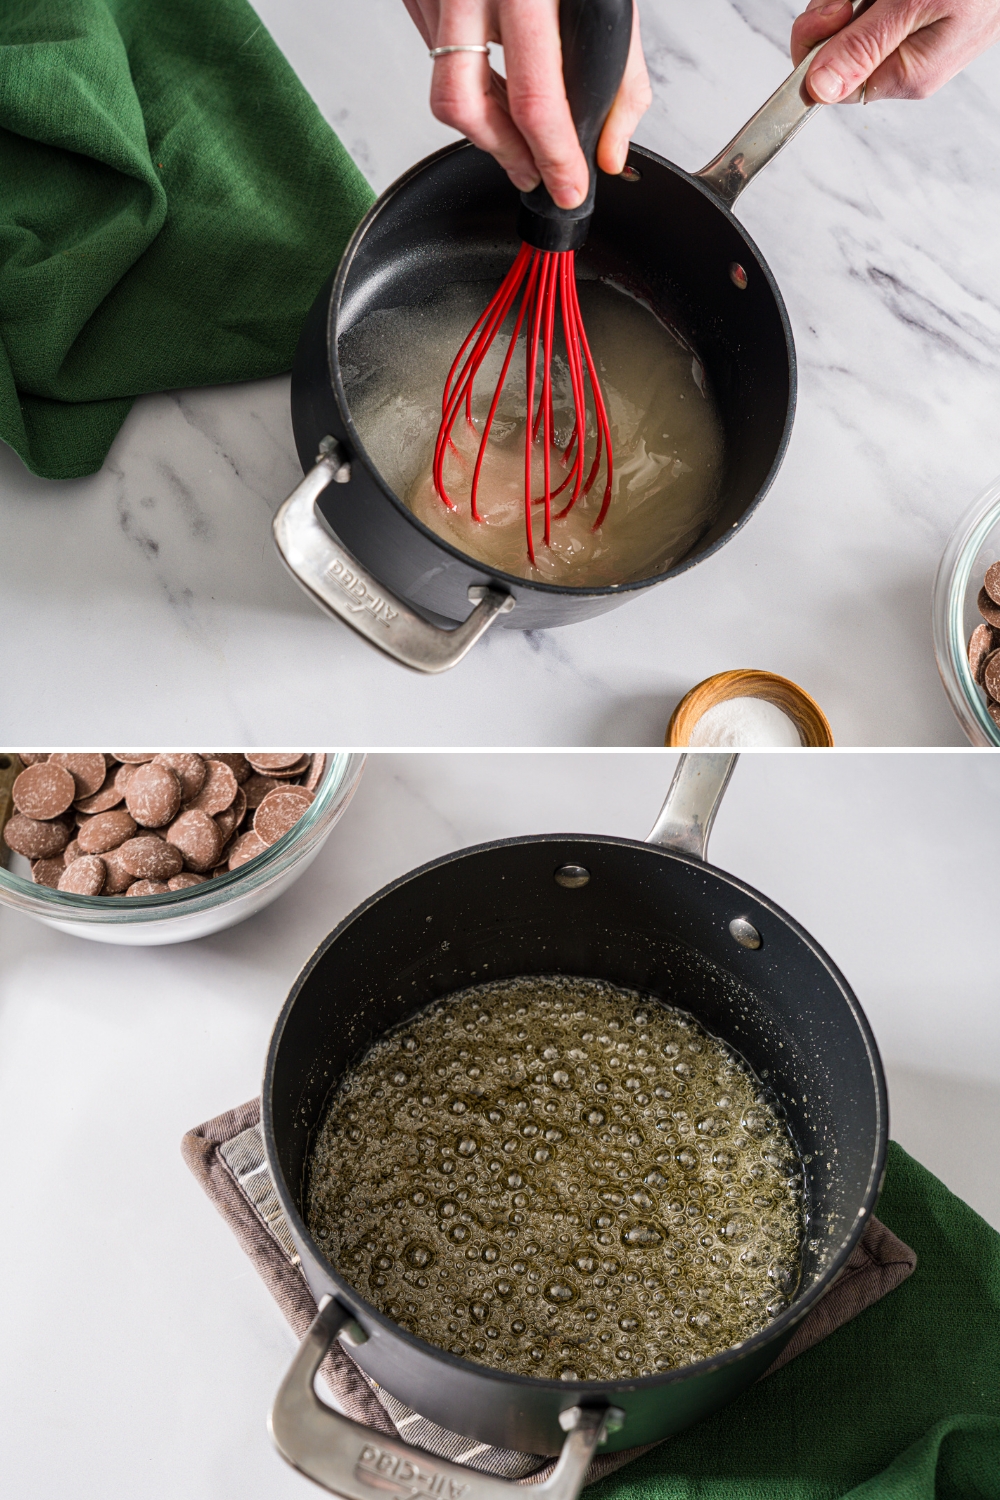
Step 2: Cook the sugar mixture
In a medium saucepan, combine sugar, water, corn syrup, and honey. Stir just to combine, then stop stirring.
Cook over medium heat until the mixture reaches 300°F, which is the hard crack stage. Do not stir while it’s cooking. If you need to move things around, gently swirl the pan instead.
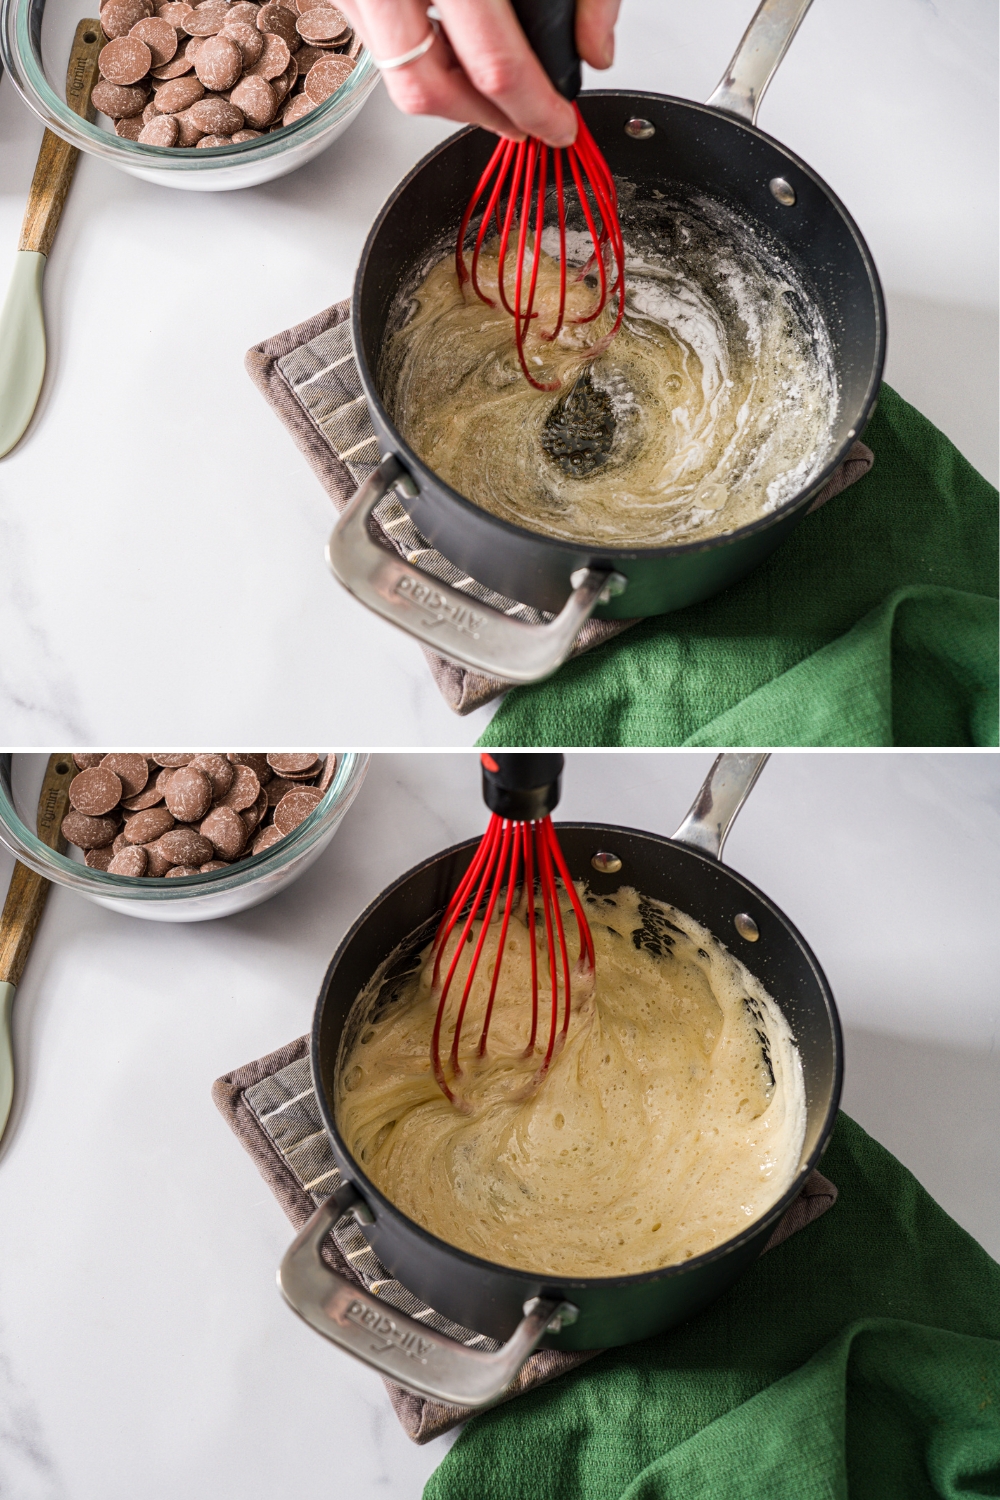
Step 3: Add baking soda
Once it hits 300°F, remove the pot from the heat. Immediately stir in the baking soda. The mixture will foam up fast and expand, so work quickly.
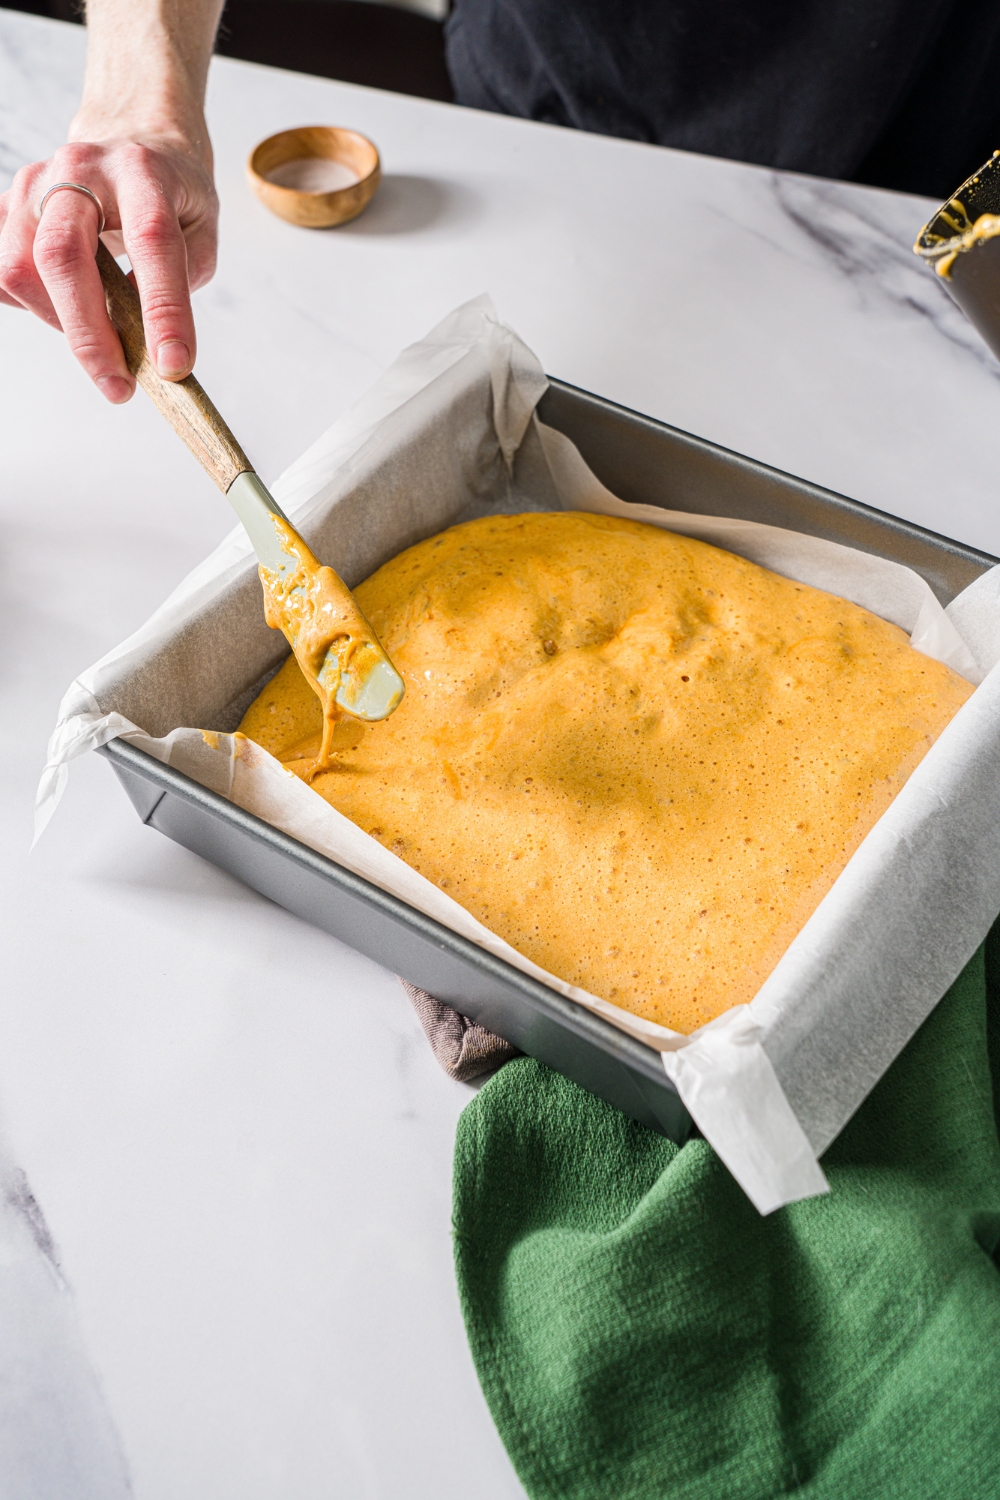
Step 4: Pour and set
Quickly pour the foamy candy into your prepared dish as evenly as possible. Do not try to smooth it too much, because it starts setting fast, and you’ll pop bubbles. Let it sit and set for at least 1 hour.
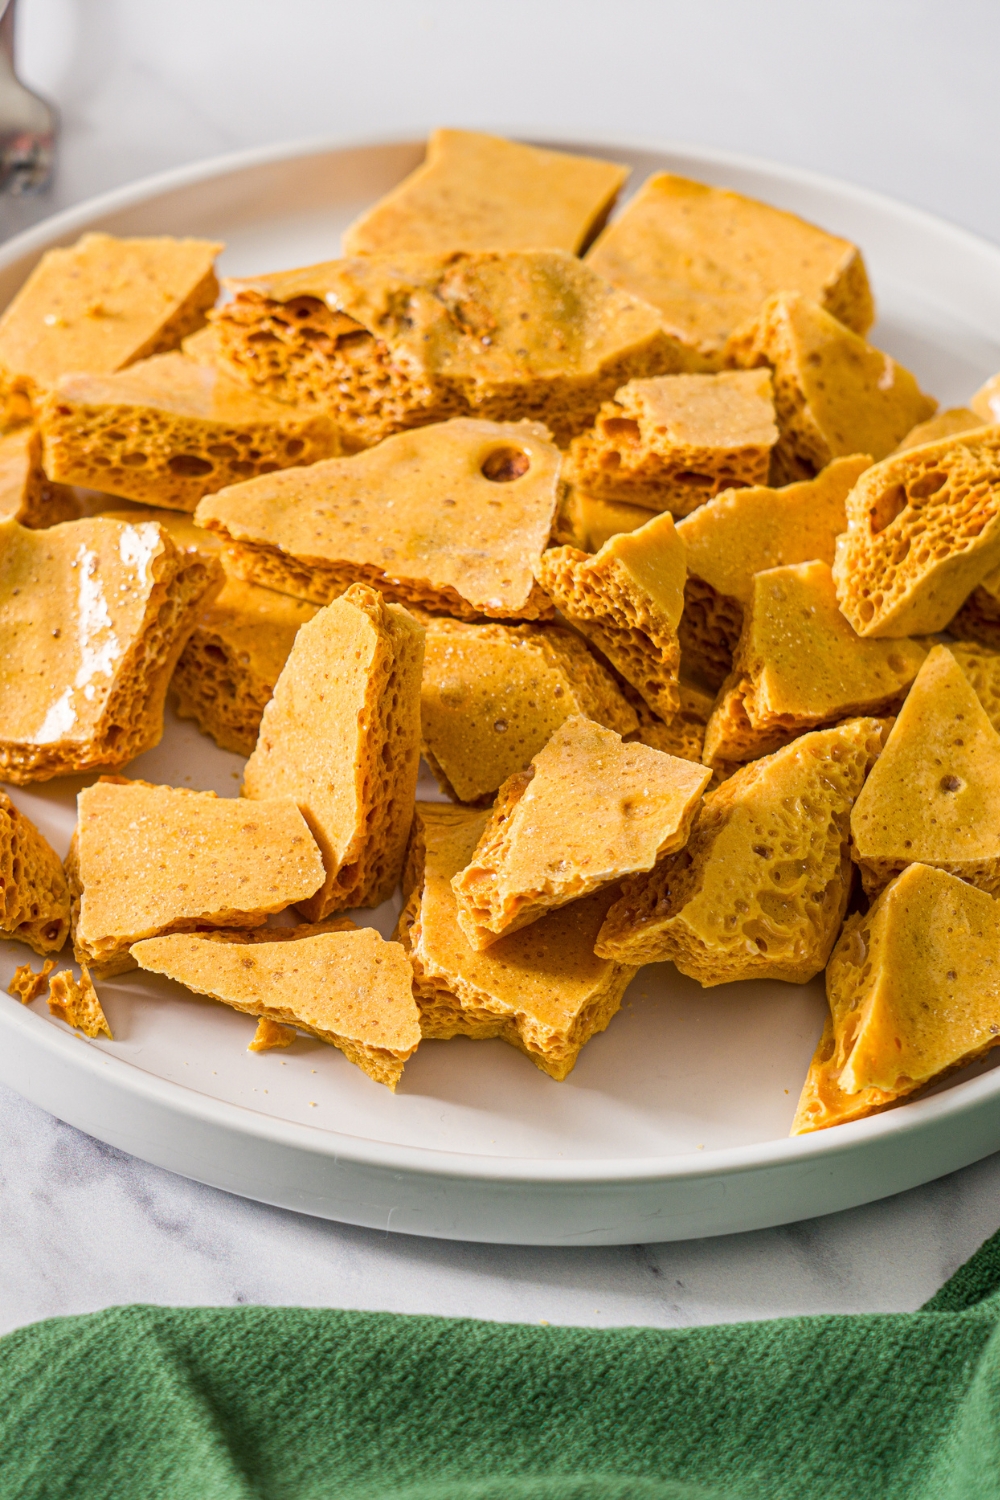
Step 5: Break or cut
Once fully set, lift it out using the parchment and break into pieces (or cut gently if you want cleaner shapes).
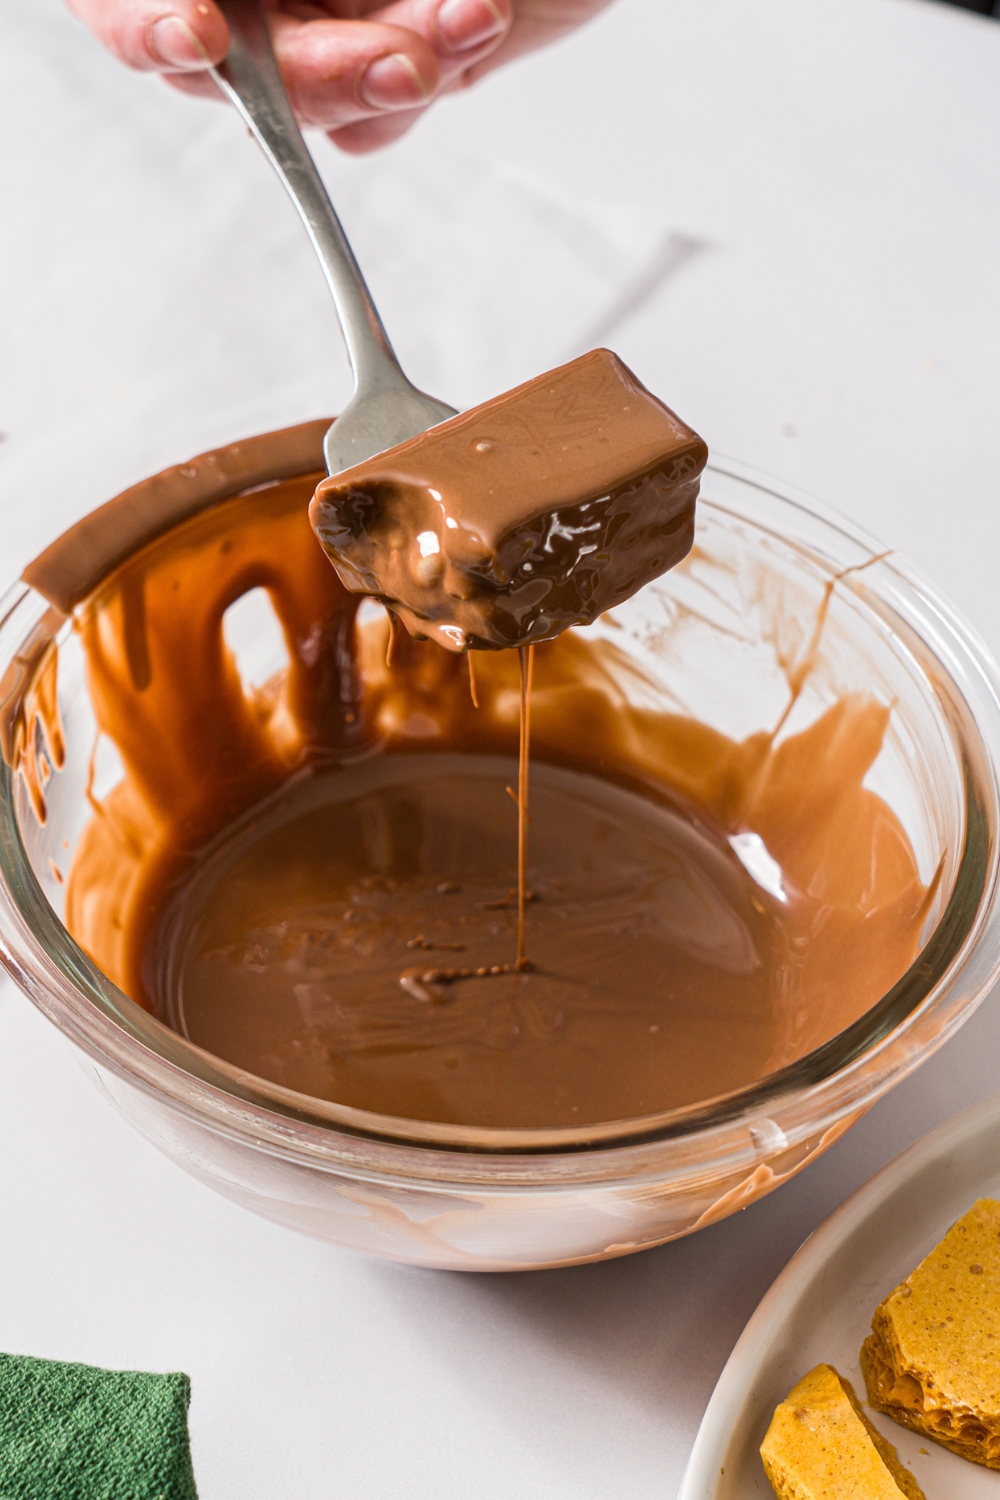
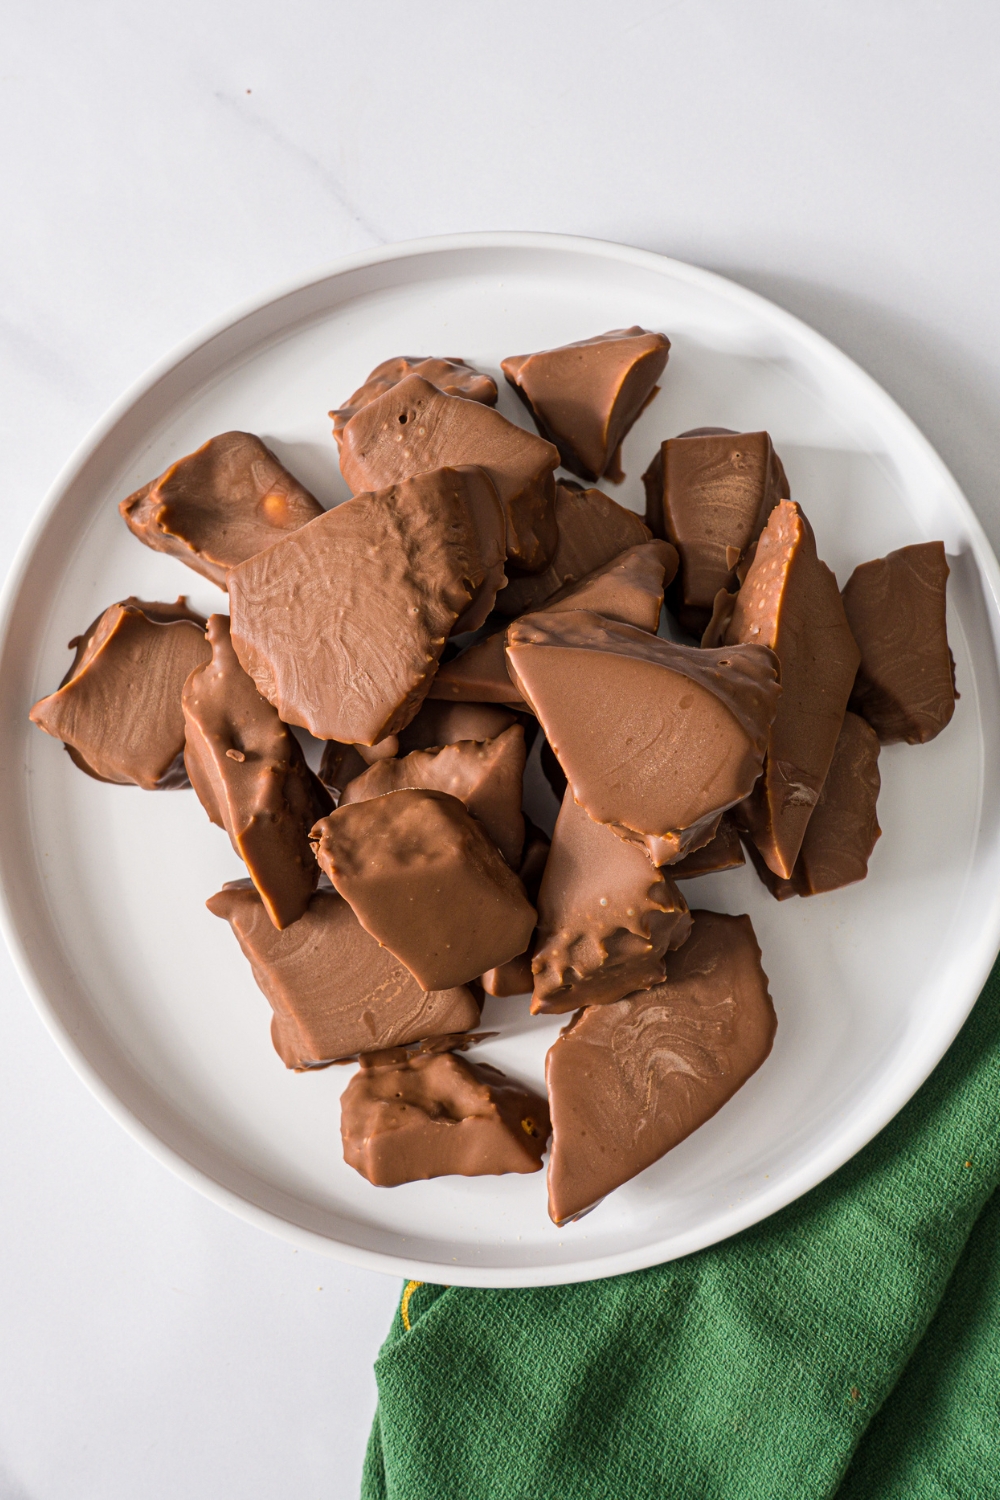
Step 6: Dip in chocolate
Melt milk chocolate (and coconut oil if using) in the microwave in 30-second bursts, stirring between each, until about 90 percent melted. Stir to finish melting smoothly. Dip each piece using a fork, let extra chocolate drip off, then set on parchment or wax paper to firm up.
Expert Tips for Perfect Sponge Candy
- Use a thermometer and hit 300°F exactly. Sponge candy is all about cooking the sugar to the correct stage. If you undercook, it can turn sticky or chewy. If you overcook, it can taste burnt and get too brittle. A thermometer makes this predictable.
- Stop stirring once the sugar dissolves. Stirring while the mixture boils can cause crystallization, which leads to gritty candy. Stir at the beginning to combine, then hands off. If sugar crystals form on the sides of the pan, you can gently swirl the pan or use a pastry brush with water to brush down the sides early in the cooking process.
- Have everything ready before you add baking soda. Once you hit 300°F, you’re moving fast. Baking soda should be measured and sitting next to the stove. The pan should already be lined. You want zero scrambling at the last second.
- Stir in baking soda quickly, but don’t overmix. You want the baking soda evenly distributed so the candy expands uniformly, but too much stirring can collapse bubbles. A quick, confident stir is the move.
- Pour and leave it alone. After pouring, do not try to spread it like brownies. The bubbles are what make sponge candy special. Let it rise and set naturally.
- Let it fully cool before dipping. Warm candy can melt the chocolate and make the coating messy. Make sure the candy is fully set and room temperature first.
- Use coconut oil for a smoother dip. This is optional, but it helps thin the chocolate slightly and makes dipping easier. It also gives you a cleaner, shinier finish.
- Dip quickly and tap off excess. Sponge candy is porous, so chocolate can pool in the holes if you let it sit in the bowl too long. Dip, lift, tap gently on the side, and set it down.
Variations
- Dark chocolate sponge candy: Swap milk chocolate for dark chocolate for a less sweet, more grown-up version.
- White chocolate drizzle: Dip in milk chocolate, then drizzle with melted white chocolate once set.
- Sea salt finish: Sprinkle a tiny pinch of flaky salt on the chocolate before it sets for sweet-salty contrast.
- Holiday toppings: Add crushed peppermint, festive sprinkles, or chopped nuts on the wet chocolate coating.
- Plain honeycomb: Skip chocolate if you want a lighter snack. It’s still delicious.
Sponge Candy Storage Tips
Store sponge candy in an airtight container at room temperature for the best crunch. It’s best enjoyed within 5 to 7 days for peak texture. Keep it away from humidity, because moisture makes it sticky.
If your kitchen runs warm, store it in a cool pantry. Refrigeration can cause condensation when you bring it back to room temp, which can make it tacky.
Sponge Candy FAQs
Why is my sponge candy sticky or chewy?
It usually means the sugar mixture didn’t reach 300°F (hard crack stage). Sponge candy has to hit that temperature for the right crunchy texture. A candy thermometer makes this so much easier and more reliable.
Why did my sponge candy turn grainy?
That’s crystallization. Try not to stir once the mixture is boiling, and don’t scrape the sides of the pot when you pour it out. Corn syrup helps prevent crystals, but the “don’t stir, don’t scrape” part matters just as much.
Can I make sponge candy without corn syrup?
Corn syrup helps prevent crystallization and gives more consistent results. You can swap it with more honey, but the texture is less predictable and the risk of graininess goes up.
How do I know when the sugar mixture is at hard crack stage?
The easiest and safest way is a thermometer reading 300°F. If you don’t have one, drop a tiny bit of syrup into cold water. It should form hard, brittle threads that snap. A thermometer is still the best move.
Can I freeze sponge candy?
I don’t recommend it. Freezer condensation can make the candy sticky and ruin the crisp, airy texture.
What’s the difference between sponge candy and honeycomb candy?
They’re very similar. Sponge candy is basically a honeycomb-style candy made with baking soda to create the bubbles, and it’s often dipped in chocolate (especially Buffalo-style sponge candy). The names are used differently depending on where you live, but the texture is the same idea.
My Final Thoughts
Homemade sponge candy is one of those recipes that feels like a magic trick. A bubbling sugar mixture turns into a crunchy, airy honeycomb, and the chocolate coating makes it absolutely addictive. If you use a thermometer, work quickly at the baking soda step, and keep it stored airtight, you’ll get perfect chocolate-dipped sponge candy that tastes like a candy shop treat, only better because you made it. Leave me a comment and review below if you make it, I'd love to hear what you think.

More Dessert Recipes You'll Love
Homemade Sponge Candy

If you’ve never made sponge candy at home (or you’ve never even heard of it), you’re going to love this. It’s a light, crunchy honeycomb-style candy with little airy bubbles inside, then it’s dipped in milk chocolate. It’s sweet, crisp, and breaks with that perfect snap. It tastes like something you’d buy from a candy shop, but you can make it in your own kitchen, and it’s a killer gift for the holidays.
Ingredients
- 1 cup Sugar
- 3 tablespoons Water
- 4 tablespoons Corn Syrup
- 1 tablespoon Honey
- 1 ½ teaspoon Baking Soda
- 1 cup Milk Chocolate
- 1 tablespoon Coconut Oil (optional for smoother chocolate)
Instructions
1. Line an 8x8 baking dish with parchment and set aside.
2. In a medium sauce pot combine the sugar, water, corn syrup and honey. Stir together to combine.
3. Heat over medium heat until the mixture reaches 300 degrees,hard crack stage. Do Not Stir the mixture but swirl gently if needed.
4. Once the mixture reaches 300 remove from the heat and stir in the baking soda.
5. Quickly pour the mixture as evenly as possible into the prepared baking dish.
6. Allow to set for at least 1 hour before cutting into pieces.
7. Melt the chocolate and coconut oil in the microwave in 30 second intervals until 90 percent melted, stirring to finish melting.
8. Using a fork, dip each piece of candy into the chocolate coating the entire piece, allowing the extra chocolate to drip off.
9. Place on a piece of parchment or wax paper to set up.
Nutrition Information:
Yield:
6Serving Size:
1Amount Per Serving: Calories: 444Total Fat: 15gSaturated Fat: 10gUnsaturated Fat: 5gCholesterol: 9mgSodium: 251mgCarbohydrates: 76gFiber: 1gSugar: 72gProtein: 3g
Leave a Reply